To start with:
Gotta have tools. The more tools you have the better. Basic tools are essential; socket set, wrench set, screwdriver set, test light, mulitmeter volts/ohms, jumper wires ( make yourself a set ), timing light, set of plyers ( angled ones are a plus ), wire crimpers/strippers, spark tester, jack and stands. If you have access to better diagnotic tools or are willing to buy them they make finding your car problems a lot quicker. Ie; automotive scope, graphing meter, noid lights, pressure tester w/gauge kit, exhaust pressure kit, compression tester, leak down tester, low amp probe, injector tester, diagnostic scanner, 4-gas analyser.
Basics of making the engine run:
Ok, everyone knows that in order for the engine to run it needs compression, ignition, and fuel.
In order for your electronics to function properly you need source power, a load, and ground.
Oil and coolant are essential for survival of moving parts.
If you have access to a VAT machine then you can simple perform and amp/voltage draw test on the battery. 300+ amps is excessive, and anything lower than 9.6 volts mean you should recharge the battery and re-test.
If you dont happen to have a VAT machine in your garage, use your multimeter to check voltage when cranking. Dont hold the starter in the crank position for more than 15 seconds, you could burn up your stator windings. You just want to see if there is actually a voltage “drop”, or the system is trying to use the battery. As before, anything below 9.6 is considered weak source voltage.
But you say, hey my dash lights work and my idiot lights come on. The radio seems to work but it still doesn’t crank over the engine.
Now that you’ve confirmed the source power (battery) is in proper working condition we move on to the starting circuit. Battery terminals must be clean and properly fastened. Even slight corrosion between the post and the terminal will be enough to keep the electronics from working properly. Battery post cleaners are cheap, pick one up and keep it handy.
Check for power at the starter, the big wire on the side of the starter. It is source power all the time, unless you forget to hook it up. Test light is quick and easy for checking. If you suspect a bad wire you can do a voltage drop test with your multimeter by checking voltage from the wire at the batter and then again at the starter. The difference in voltage, is what is called the “drop”. It should be very minimal, less than .25 volts , most of the time it reads the same.
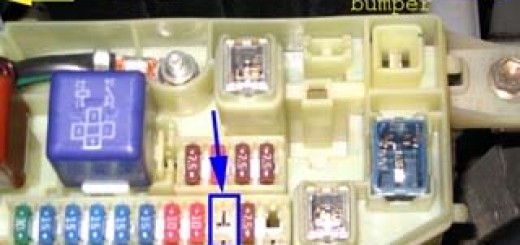
The next wire to check is the ignition start terminal, the connector located right next to the big power wire. That is power that comes from the ignition switch (key switch). Someone will need to turn the key in the crank position while you unplug the connector and check it with the test light. It should light the test light every time the key is in the crank position. If it does not, then your problem lies in the ignition start circuit; key in crank position power, clutch switch/or park/neutral position switch, starter relay, or ground. Now the simplest thing to do is find your starter relay and make sure it has power, key power , ground and load. Unplug the relay, it should have power at one terminal, power at another when the key is in the crank position, a good ground at one terminal, and the load side should be the same as the wire that goes to the starter. Now before you put a wire across the relay to bypass the starter ( will need the electrical diagram or else you smoke fuses ) you could also use a remote starter (also cheap tool you can buy) and hook it right up to the starter to see if it actually works. The remote starter is basically a switch with long wires terminated with clips so you can pull power and apply it directly to the ignition terminal on the starter to see if it actually engages and spins. I suggest making sure the vehicle is in neutral/park with parking brake set, or the rear wheels are off the ground. Nothing like standing next to your car and hittin the button just to see it take off on you, heeh. If you have igntion crank power then that means the ignition switch works and the clutch or park neutral switch works. If you dont have power than check your fuses ( the BGB or a decent repair manula will come in handy ). If you suspect a bad ground from the relay you can always use a jumper wire to ground ( radio shack is gonna be your best friend, heh.). Or as mentioned before, if you know how to read a wiring diagram then you can jumper the relay connector and completely bypass the relay.
Now keep in mind so far all we’ve really checked is power through the system. You must have a dedicated engine ground. That big black wire that runs from your tranny or block straight to the body. The starter pulls lots of amperage and a thin wire will not be enough. Make sure grounds are clean and properly secured.
Fuel system requirements: Alright, no matter what type of fuel you are using you need volume and pressure. Since we are doing diagnostics and not tuning we are going to skip AFR’s for the moment and go to requirements and delivery. A fuel pressure test will be handy, they’re relatively inexpensive for what they can tell you so buying one is a good investment. Since there are no schraders you are going to have to get a kit that will allow you to tap into the fuel filter or cold start banjo fitting. The proper place to test for line pressure is before the fuel rail. You are looking for about 40 or more psi when the system is primed and at least 36 with the engine running. Think of the injectors as gates, they dont make the pressure. You need the pressure for a proper spray pattern. Modern day engines run higher pressure but with about 40 psi it should try and run. With the gauge you can also see if you have an excessive drop in fuel pressure with the engine running or if an injector is bleeding off. Volume is a little tricky. You could use a graduated beaker and see how much volume is pumped at a certain interval. A quick test for the DIY‘er is to use a bottle and plumb the fuel delivery hose into it. A quick prime or start should fill the bottle quickly. Now would be a good time to tell your smoking buddies to put out their cig’s , hehe.
The injectors not only need to fire electronically but mechanically. A quick probe with your test light or meter will tell you if the injectors are powered. A noid light or inductive injector testor will pulse the light when the injectors fired. Even a long extension on the injector body and your ear up to it will make a noise when the injector fires and the pintel contacts its seat. If you have a low amp inductive probe you can actually see the pintel come off it’s seat and fire on a graphing meter. They should all react the same. A silent injectors or one that does not pulse has issues. Even though it works electronically dont assume that the injector is delivering fuel correctly. A leaky injector or one that is partially clogged will cause troublesome driveabiltiy issues that will be hard to track down.
Now assuming that the injectors are the suspect problem. You can pull the rail out with the injectors intact and do a quick test fire to check spray pattern. An electronic injector tester has a pigtail connector and is independently powered so you can fire the injector manually. Being able to physically see the injector work connected to the system is sometimes a pain in the ass to do but well worth it when chasing driveability issues. Dont assume that a wet spark plug means the injectors are working properly. When in doubt, take them out and have them tested. It’s cheap insurance and in some cases remanufactured ones are cheap enough that it’ll save you time instead of chasing all the possiblities.
It’s always a good rule of thumb to replace the fuel filter when you replace injectors. If something got by the filter to mess up the injector, then it’ll do it again to the new ones. Don’t forget to get new o-rings and grommets.
When performing a compression test make sure that the ignition and fuel system are defeated. I like to use a remote starter when the starter is easily accessed. That way the key does not need to be on and the electronics are not powered. If you plan on just cranking the car you can pull the relays or main fuses.
Testing is best done with the engine warm, near operating temp, to get the best results. General rule of thumb is 5 complete cranks. You should see 150-175 on most engines. In peformance application the range will change. Around 130 is the breaking point for decent compression. Once it drops below that it starts affecting the the cylinder’s ability to produce power without some sort of induction.
A wet test is where a little oil is added to the cylinder to see if the piston rings are adequately sealing the chamber. You can do a regular test and then a wet test to compare the difference. I find a little plastic syringe with a vacuum hose on the end of it works pretty good. You can see how much oil you are adding and it doesnt make a mess.
The first compression stroke on the guage should be a quick solid jump followed by shorter jumps until you stop cranking. You may notice a little drop when the guage stops, especially with a big gauge, but what you are looking for is peak numbers. Rule of thumb is 15 percent variation between all cylinders.
Keep in mind compression happens rather quickly. You are only checking to see if there is enough compression for the engine to run mechanically. A leak down test is the best way to determine the condition of the parts exposed in the chamber. If you have access to a borescope, handy little self powered inspection camera, you can take a look inside the chamber.
The basic components to the ignition system: igniter, coil, distributor, distributor cap, distributor rotor, spark plug wires, spark plugs. Now if the system is coil on plug or distributorless than you wont have some of the parts. The igniter needs a signal to fire the coil. On vehicles with distributors the sensors ( or pick-ups as we like to call them) are located inside the distributor.
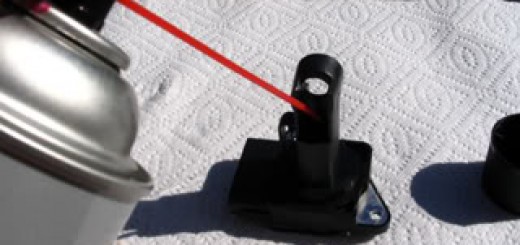
The first test is to see if we have spark. A spark tester is a handy cheap tool that generally plugs into the end of the spark plug wire and then is grounded. You are looking for a nice sharp blue spark. If you don’t have a spark tester you can use a screw driver in the end of the plug wire and hold it a couple millimeters from a good ground and crank on the engine to see if there is a spark.
If there is NO SPARK generally the first thing we check is power at the coil and if the igniter is controlling it. The simplest quick test to do is ground the secondary side of the coil ( so you dont burn it up) and then crank on the engine with a test light on the negative side of the coil. The light should be nice and bright with the key on and then flicker quickly when the engine is cranking. If you dont know what the seconday side of the coil is, it’s the contact that goes to the center of the distributor rotor. If the light flickers, that will tell you that the pick-up is generating a signal and the igniter is grounding the primary side of the coil.
Now if you have a coil on plug system it gets more complicated because you need an inductive device to check the coil operation. You can try pulling the coil packs and using a spark tester.
So let’s say you have power at the coil and still no spark, but the test light only dims on the negative side of the coil when you crank the engine. That’s usually a sign of a bad igniter that can no longer properly ground the primary side of the coil. If you get no change at all then you need to check the signal from the pick-ups. Since most MR2s are distributor systems we will only discuss this particular application. The pick-ups are inside the distributor so take a good visual inspection to make sure they are not damaged or coated with oil. You will need the BGB for wireing daigrams and a good mulitmeter to check the signals. Unless you have a good graphing meter to check pick-up wave forms the best that you can do with a digital meter is checking power and resistance across the sensor. This is generally about the time when most people start looking for a “known good part” to swap in for testing. I generally keep a few good spare parts like distributors and airflow meter and oxygen sensors and ecu’s around for testing purposes.
Let’s assume that you’ve done all the basic tests and the coil/igniter/sensors all come out good but still no spark. Now you will have to test resistance/continuity through the distributor cap and wires. That white crusty stuff that grows inside the distributor cap can be enough to stop the spark from traveling across it. High resistance, like worn out spark plugs or chaffed wires can cause the spark to prematurely jump to ground before it gets across the spark plug. A couple of quick tests for random ignition misfires are a light water mist with a spray bottle over secondary ignition components. You can actually see the spark jump sometimes or the engine misfire increases. You can also run a jumper wire along the secondary components with one side grounded. If there is a weak point then you’re supplying a great groung path and the spark will go to your jumper wire. Snaping noise generated when an errant spark jumps to ground. Even a decent timing light will show intermittent flashes on a bad wire.
Mechanical timing: The relationship of the crankshaft to the camshaft(s). There is a TDC mark on the crank pulley and crank sprocket. There is also a timing mark on the cam sprocket(s). A quick check is to line up the crank pulley mark on zero and then take the distributor cap off to see if the distributor rotor is pointing at cyl #1. On a 4 cylinder you can be 180 degrees off so if the rotor can also be pointing at #4. It is best to use cylinder #1 since that’s what’s going to start the whole process, so rotate the crank till the rotor come around to point at it. Now is a good time to see if the rotor actually moves, in case you suspect a broken timing belt. On a dual cam cylinder head, it is best to remove the top cover so you can verify that both cams are in the proper position. If you have a chain driven engine or one without a distributor you can use a compression tester. Install the compression tester and rotate the engine till you see the gauge move. That will tell you that the valves are closed and the piston is moving upwards ( which is the compression stroke). On an engine like the 4a you can stick a long screwdriver down the spark plug hole and turn the crank till the screwdriver stops moving upwards, that’s pretty close to TDC.
Electronic timing: This is where sensors take mechanical timing and use it to fire the spark plugs and fuel injectors. Base timing is what the computer uses as a baseline for ignition advance/retard and injector pulse. If you’re base timing ( mechanical timing ) is off then every action there after will be off. This is where a timing light and more sophisticated diagnostic tools come in handy. Always start off with checking base timing. On the MR2’s that is accomplished by jumpering terminal E1 and Te1 in the diagnostic box. With the timing light hooked up you should see the advanced timing mark jump back to zero. You should also be able to notice a change in how the engine runs when you jumper it to base timing. It is very important for the computer to see that the engine is at normal operating temperature and is idleing. Otherwise you may not be at true base timing. If your engine is stock then use the base timing specs in the BGB ( or the sticker under the engine compartment lid). If you have a performance engine then you will need to make sure that base timing is where you want it to be at.
If you dont have a timing light I suggest getting one that will show you degrees and rpms. One that is compact is better since it can be hard to get a good look at the crank pulley. I generally try to clean the mark off and paint it. Anytime i have the timing cover off i always paint the crank pulley mark and the degree marks on the cover. It looks good and it makes it easier to see later. My timing light is a black light, makes white paint glow so it’s easier to see even on bright days or a well lit shop.
The first thing we’ll start off with is engine performance. The engine must be able to rev smoothly in neutral and in gear. There are all sorts of engine performance driveabiltiy complaints so we will begin with the basic diagnostic terms.
stumble/misfire on acceleration = it seems like it jerks and bucks when starting from a stop or accelerating from a lower speed. May not be as noticeable in neutral as when in gear. Typically an ignition misfire when it is not limited to a certain rpm. Do the ignition/spark system basic tests. If it always seems like it happens at the same rpm’s then check the throttle position or map/afm sensors.
Hesitation = it seems like it takes more time for the engine to pull at certain rpms. This can be a result of improper timing or not enough fuel/air delivery. Depending on how long the duration it is in the rpm range or if its at the top or at the bottom will point you in which system to check first. Typically at the bottom of the rpm range you should be checking: tps, afm/map, timing, vacuum leaks. In the middle rpm range: tps, afm/map, timing, egr. At the upper rpm range: tps, afm/map, timing, egr, fuel.
Lack of power = when you step on the pedal and it seems like the engine doesnt pull like it’s suppose to. Check the basics. An engine that pulls slowly at the bottom rpm range and then seems to “pick up” at the top is generally a sign of retarded timing( now is a good time to use that new timing light you just bought). If it seems to start pulling but then just flat lines like it’s out of breath, suspect restricted exhaust or lack of fuel. Holding your hand a few inches form the tailpipe while somone revs on the engine, there should be a nice flow. Sometimes removing the O2 sensor from before the catalytic convertor can be enough to make a noticeable change with a plugged cat. A basic fuel system test will determine if you are supplying enough fuel to the rail. Give the spark plugs a good visual to see if they are running lean. Even a partially open EGR valve can return enough exhaust to bog the engine down.
Intake leaks are a whisteling sound that goes away when the engine is revved. A 2 foot long piece of heater hose and your ear is almost as good as any electronic listening device. Just put one end to your ear and move the hose around to gaskets/seals on the intake that you suspect may be leaking. If you like to party, a party fogger is a cheap alternative to a nitrogen leak detection system. All you need is a bunch of vacuum tees in different sizes and a good place to tap into the system. Let the machine warm up, push the button and look for whisps of smoke.
This documentation in no way replaces the Toyota MR2 Repair Manuals. The purpose of this content is only to provide supplementary information to fellow MR2 enthusiasts. Midship Runabout and its contributing authors will not be held responsible for any injury or damages that may occur as the result of practicing any of the methods or procedures described within this website. Article and photo submissions are property of the contributing author.