I finally saved money to do something with my black car. I’m undecided as to if I should rebuild, or buy a GenIII clip. I really believe the GenII motors are alot less stout then the later Gens, but their are alot of cons with getting a GenIII too (parts availability, install difficulty, they require higher octane gas etc…). We’ll see what happens. First step is to get the old toasted motor out. When we’ve done these before, there are alot of wires, fluids, connectors, bolts… that can be done by one person. Once all this stuff is out of the way, it’s very helpful to have 2 or more people there during the actual drop. The “drop prep” stuff can be done in around 3 – 5 hours by 1 person. It will take a few more hours if it’s their first time.
Here we go…
Disconnect the battery completely. Make sure you have plenty of room, the right tools, chalk the tires when neccessary, good jack stands, and a good jack. Be very careful especially when under the car (wear goggles and golves). My poor dirty car! Actually I washed it the day before, it was much much dirtier. It has sat here for 6 months… This is the most space we’ve had for a swap. A two car garage, it will be nice to not have to kick parts around to make room for ourselves.

1. Remove engine Hood. 4 10mm bolts. It helps to have 2 people for this.
2. Remove the engine side vents. Two 10mm bolts each.

3. Remove the engine lower plastic covers. Many many 10mm bolts.
4. Jack the car up, drain the oil.

5. Drain the tranny fluid. 24mm bolt.


6. Drain the coolant from the block. (I used a new 10 gallon bucket to catch it in). You may also want to drain the radiator and middle coolant pipes, see the Coolant Flush article for info on this.

7. Remove suspension brace if you have one. 2 12mm bolts, 2 12mm nuts.
8. Take out your air filter assembly all the way to the turbo. Remember to pop the clip off the AFM, and not take out the screws.


9. Take off the intake pipes going to, and coming from the intercooler.

10. Pop off these three connectors (intercooler fan, o2 sensor, and AC).

Remember where to route the Cruise Control line.

11. You can leave the throttle body on, but if you are going to take it off now, this might help. You do have to take the throttle cable off of the wheel on the right though.

12. Disconnect the ground strap. The bottom 2 arrows point to the strap. The upper arrows are pointing to the fuel lines, more on those later.

Here, the top arrow is pointing to the socket on the engine side strap bolt, and the lower arrows are pointing to the strap.

Another ground, this one is just a clip, it’s below the fuse box a little to the left (fuse box is the blurry thing in the bottom right for reference).

13. Brake booster line. You can see the oil cap on the right for area reference.

14. DLC1 and Map Sensor removal (that’s what the BGB says). Remove the pressure sensor/diagnostic connector by undoing the 10mm bolt, and the clip on the right. Put the bolt back in it’s hole, and lay the pressure sensor/diagnostic connector on the engine.

15. Disconnect AC Idle up 2 hoses and electrical connection. Disconnect Fuel Pump and Injector relay connections (note, I do not have a Fuel Pump relay on my car).

Another angle.

Another angle, this is one of the AC Idle up hoses.

Another shot. The top arrow is supposed to be pointing away from that hose, and towards the pipe tee, not away from the AC Idle up electrical connector.

16. BGB says to remove the water filler. Just disconnect this hose instead.

17. Remove Charcoal Canister.
Top hose first.

Then there are 2 10mm bolts on either side of the can itself.

Now bottom hose.

Another angle.

18. Remove Engine Relay Box and disconnect Engine Wire.
Pull the fuse box top off, pull back the rubber on the engine positive terminal (battery is disconnected riiiiight?), undo the two nuts.

Now here’s a fun one, you have to get the wire loom with the two white connectors and the main power terminal detatched from the fuse box. It would be helpful if Toyota used some clips that made any damn sense, and also if some of the clips were the same type!!!! ARGHHH! Play around with it (I had to unbolt the fuse box from the firewall and look underneath), and detatch that wire loom from the fuse box.

19. Disconnect Coil connectors.

The arrows pointing to the right show the where they came from (the coil) below the Fuse Box.

Don’t forget this guy (mine was floating for some reason). The lower arrow points to the coil and it’s top connector.

20. Discnnect the Engine Wire Loom from Trunk.
Here’s what you need to pull out of the trunk. Unclip the 3 clips from the ECU. Fan and Starter Relay clips on the right. Then, if you have a pretty much stock car, you can pull those guys through (the red circle) towards the engine compartment. If you’re unlucky, and like me, you might have to do alot of nasty unwiring 🙁 I’m probably going to make some quick disconnect clips since I’m in there.

Another shot of the trunk connectors.

Here it is, free, free at last!

21. Disconnect Starter wires.
Be sure to have your battery disconnected first. The black box covers 2 of the wires. Pop it off.

Use the 14mm on that bad boy.

Pull the two wires off, and put the nut back on, then replace the black box so you don’t lose them.

There is one connector to the passenger side of the black box. Unclip that little guy.

22. Disconnect all the coolant hoses, and the fuel lines.
Here are the 2 heater lines. It seems best to get the clamps off, then use something (coat hanger, 90 degree needle nose pliers) to loosen the seal between the hose and the pipe, then twist the hose right and left to get them off. This works for most of the coolant hoses on the car.

Yep, I (half assededly) plugged them. Don’t want much air getting in contact with the NPG+ coolant 🙂

Here’s the main inlet hose next to the dipstick.

Here’s the main outlet hose. The bottom arrow points to the filler pipe hose we already disconnected in step 16.

Here’s the fuel filter banjo bolt. Get some rags out in case it sprays fuel everywhere (to help avoid this, unscrew the gas cap to release pressure in the fuel tank).

I used alot of extensions to make it easier. That thing is on pretty tight.

Put the bolt and the 2 washers back on the fuel filter.

Pull the fuel return hose off here. Ignore the lower arrow.

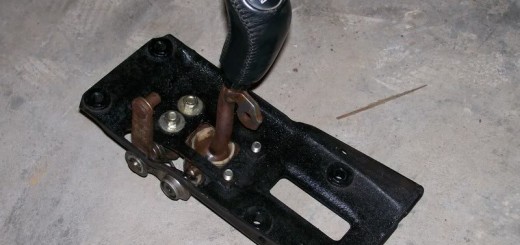
23. Disconnect the tranny cables.
The starter (red circle) should give you a reference for where these are.. Pop the 2 clips off with a screwdriver or pliers, pull the cables off, and put back the washers and clips. One cable has 1 washer, and the other has 2, don’t mix them up.

Now, get under the car, and pop these two mount clips off the cables with a screw driver and hammer. They pop straight up and off.

Then push the cables out of the mounts so that they are free floating.

Here’s another shot of a clip partially off.

24. Remove Exhaust system.
Aftermarket systems are much easier than stock. You may want to use some PB Blaster on all of the bolts a day before hand to make your life easier. If you strip out a stud/nut/bolt, be prepared to drill it out. Notice I previously drilled out the stock studs, and used nuts and bolts instead.
3 on the cat.

2 on the rear b-pipe with the Greddy Power Extreme system.

The rest of the pics show the 3 hanger locations.


25. Remove the Intercooler fan if you want. 3 bolts. Not too tough.
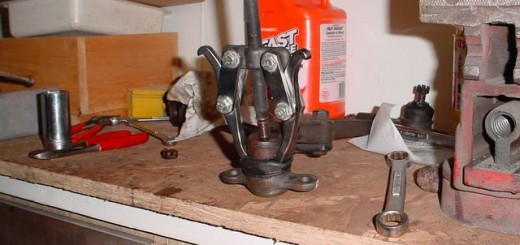
26. Disconnect the AC Compressor from the engine.
What we got here is 2 upper and 2 lower 12mm bolts attatching it to the engine block. The 2 lowers are shorter than the uppers. (I was missing 1 upper). The 2 uppers can be gotten from above, and 1 of the lowers from below, the other from above. You’re going to have to lean way over the engine.
Here’s a shot from below with the 2 lower bolts almost out.

The top arrow shows 1 of the lower bolts. The bottom left shows my missing upper bolt, and the one on the right, the other upper bolt.

Once it’s loose, pop the belt off. We’ve been using a bungee cord (not pictured) to hold the AC Compressor hook (on the left next to the dipstick) to the rain guard above it. When dropping the engine, you have to be sure to move the AC Compressor out of the way.

Here are 3 of the 4 12mm bolts.

This documentation in no way replaces the Toyota MR2 Repair Manuals. The purpose of this content is only to provide supplementary information to fellow MR2 enthusiasts. Midship Runabout and its contributing authors will not be held responsible for any injury or damages that may occur as the result of practicing any of the methods or procedures described within this website. Article and photo submissions are property of the contributing author.

I own a 2000 spyder, recntly swapped the motor from a pontiac vibe (1zz-fe) into my spyder. After the swap the thing wouldnt turn on. Any help on what it could be? Have some coolant mixing in with oil….. please respond at your earliest convenience. Thank you