Parts:
3/16 “Hanging Wire” ———————@ .23/ft – HomeDepot
1/4 Steel Round Solid Rod ———– 3′ @3.12 – HomeDepot
#6-32 x 1/4 In. Socket Set (2) Screw—- @ .52 – HomeDepot
HackSaw ——————————- @3.97 – HomeDepot
Extra Blades —————————- @2.49 – HomeDepot
#8-32 Drill Bit & Tap Set —————–@4.45 – HomeDepot

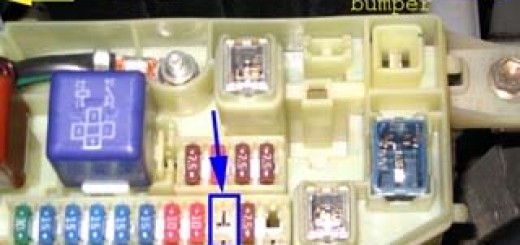
So well start with removing the throttle cable. Im not sure if these cars come more than one way, but the way my car is setup it has 2 halfs of a throttle cable. One for the pettle and the other half from a box to the throttle cable. That box has 3 cables coming out of it. One should be for the throttle, one should be for the cruise control, and one for the actual throttle body. Remove your passenger side engine cover. Under it should be the black box with the cables and a screw should be on the top of it. Remove the screw to remove the cover to gain access to the cables. After it is removed it should look like this.
Then you will remove the cable that links the throttle body to the box. You can remove the cable at the throttle body first so you have some slack to play with when removing the cable from the box. If your car is like mines the cable end will be stuck. What youll want to do now is remove the clip from the top of the shaft <<!!Becareful not to loose the washers ON TOP and UNDER the plastic pulleys!!>> Then youll want to use something slightly bigger than the opening of the barrel of the cable to brace the plastic while you tap the barrel end of the cable out.

Depending on the condition of your cable (which ill assume is not all that great, else why would u be looking at the write up) you might want to measure the cable from end to end and cut your new cable to that length <<!!the cable will untwist if not cut right!!>>. Then you’d want to cut your cable and remove it from the housing. I elected to spray some lubricant into the housing then run my new cable through the housing.

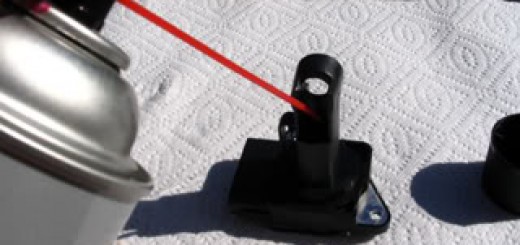
Now we’ll work on making the barrel ends. Take your rod and place one end in the pulley and line it up. Mark where you want to make your cut.

Then push the rod in further till you see the line you made ontop of the pulley. Make another mark, these will be your new barrel ends for the cable. While your there, you might want to mark the center points where the cable will sit.


You will now want to cut the two tips off of the rod at the marked points. (Thats why we bought the HackSaw). After they have been cut off <<!!CAUTION THEY WILL BE HOT!!>> Your going to want to Drill out the center of the rod and tap it with the drill and tap set. <<!!CAUTION THEY WILL BE HOT!!>>

After you’ve drilled and tapped both ends, you’ll want to drill your center hole <<!!ONLY HALFWAY THROUGH!!>>, this is what your cable will go through. (Start slow and work your way up with speed once your pilot divit has been made.) Once you’ve done that. Place your cable through the center and tighten your set screws on both sides to hold the cable in. Do this for both ends of the cable. After that is complete reinstall cable.


This documentation in no way replaces the Toyota MR2 Repair Manuals. The purpose of this content is only to provide supplementary information to fellow MR2 enthusiasts. Midship Runabout and its contributing authors will not be held responsible for any injury or damages that may occur as the result of practicing any of the methods or procedures described within this website. Article and photo submissions are property of the contributing author.