Note: Hose from Hell is also known as HFH.
Description of HFH
The HFH is a simple 5 inch coolant hose on the MR2 Turbo that usually wears out and burts sometime after a car hits 100K miles. The symptoms of a bad HFH are low or no heat coming from the heater vents, water dripping under the engine near the exaust, and finally, a full burst will result in smoke clouds billowing out from under the engine compartment, and high temps. Sometimes people think they’ve blown a headgasket, but if you look under your car, and directly under the downpipe and exaust, there is water, it’s very likely to be the HFH. It is a major pain in the ass to fix without taking the exaust manifold off of the car, but it can be done in a few hours if you have patience, the right tools, and not overly large hands (borrow a kid from the neighboorhood to help!).
The HFH itself is made out of heavy duty rubber hose with a thin heat barrier shell with 3 outer clamps. The center clamp helps keep the heat barrier on and stop expansion of the hose, and the two clamps on each end hold the HFH to a metal coolant hose, one coming off of the Oil Cooler (which the oil filter bolts onto), and the other to a pipe called the Water Bypass Pipe that leads under the Exaust Manifold. It has a sister hose known as the Hose from Hell on Earth or HFHOE. The HFHOE connect to the Oil Cooler on the passenger side, and should be unclamped in order to remove the oil cooler for access to the regular HFH.
Cost of HFH replacement at the dealership = $300 thru $600+
Cost of fixing the HFH yourself = $5 (plus possible $5 – $30 in tool and replacement parts purchases)
BLAH
Pat actually did this back in early 2000 on his first MKIIT. He was originally going to show how to do this while the engine was still in the car with pictures, but after blowing his 1st motor, that plan is out the window, so we’ll have to stick to a description of the process.
DISCLAIMER
We do not recommend replacing the HFH and/or HFHOE unless you are determined, have small to medium hands, are able to work in awkward positions, have patience, are willing to buy any needed tools and parts that you don’t already have, and finally, ENJOY WORKING ON YOUR CARS!
We have to put a disclaimer on this one, because you can scrape/cut your hands, break or strip out parts, and possibly go insane! Please attempt this only if you are of sound mind and body, and of your own free will. 🙂
Required Tools
– A new Hose from Hell, Toyota Part # 16283-88381
– Normal and Small metric socket wrench and socket sets with mandatory 10mm and 12mm sockets. Extensions are also a must.
– Deep well 30mm Socket. This is for the Relief Valve on the Oil Cooler.
– Metric Open end wrench set.
– Long 90 degree bend needle nose pliers. These can be purchased from Sears Tool Department.
– Alot of towels, blankets, or drop cloths to protect your cars paint, since you will be leaning over the passenger side for a few hours.
– Gloves (heavy duty a definite, but small latex gloves will be very helpful as well).
Reccomended Extras
– New Oil Filter (Toyota brand of course!)
– New O-rings for the Oil Cooler, new gasket for the Water Bypass Pipe, and O-ring for the Oil Dipstick Tube.
– New Hose from Hell on Earth Toyota Part # 16282-88380
– Possible need of toys and candy to get the neighboorhood kid to do all the work for you 🙂
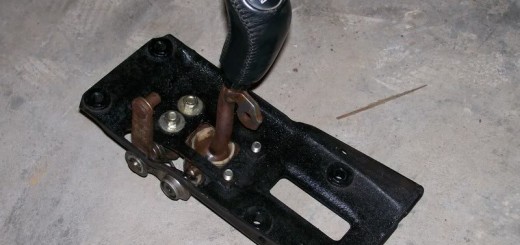
Procedure Part 0 “Pre-Op Study Pictures”
Study the pictures below, and at the bottom of this page to get familiar with the parts and their locations.
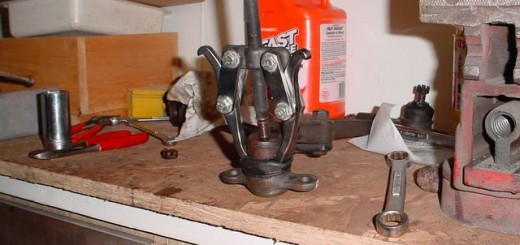
Picture #1, view from behind the Oil Cooler and HFH with Exaust Manifold missing, note the full oil cooler assembly (both top and bottom), with old hose from hell connected. Also note the oil dipstick tube and the spot that it plugs into the block.

Picture #2 and 3, here you can see where the HFHOE connects to the Oil Cooler Top. The wrench in the picture is connected by a 30mm Socket to the Relief Valve.


Picture #4, you can see the HFH next to the oil cooler. Note that the oil cooler top is not connected. You can clearly see the 4 bolts that hold the oil cooler bottom to the engine block.

Pictures #5 and 6, show the relation of the HFH and the exaust manifold. Note that the Turbo and Down Pipe are not connected.


Picture #7 Shows the view you would have looking from above. The Oil Cooler and general location of the HFH under the exaust manifold is highlighted. Note that the smaller heat shield and the dipstick tube have not been removed in this picture.

Procedure Part 1 “Getting to the HFH”
Tip1: You do not need to drain the coolant as the BGB specifies. You will drop a little when pulling the oil cooler off, but not that much really.
Tip2: Wear gloves!
Tip3: Put a towel over the trunk in front of the spoiler so you can place tools on it for easy reach.
1. Remove engine side covers, and place them in a safe spot.
2. Remove intercooler piping with 10mm socket, and plug ends with towels or socks to prevent debris from entering.
3. Remove Exaust Heat Shields with 12mm open end wrench. To get the smaller heat shield off, you must also remove the Oxygen Sensor (which is very easy with only two 12mm nuts securing it) If I remember right, there are 3 bolts on the main shield, and 211n the smaller downpipe shield. 1 on the main shield is hard to see, it is in the center near the bottom of the shield.
4. Remove the Oil Filter. I use a claw type tool bought from the local car supply store that works really well.
5. Remove Oil Dipstick Tube. There is one 12 or 14mm bolt on the top bracket. Once that is loose, you can pull the tube up, and it will pop up out of the block. Check to make sure the orange o-ring is at the base, and make sure it is not cracked or brittle.
6. Remove Relief Valve and Plate Washer from center of the oil cooler with the Deep Well 30mm Socket.
7. Remove the two nuts connecting the Oil Cooler Top to the HFH. Be careful to keep any o-rings and gaskets (there is a metal gasket inbetween the two nuts and the HFH pipe) connected to their proper parts, and I suggest placing all parts in plastic bags.
8. Remove the HFHOE from the Oil Cooler Top by removing the clip.
9. Remove the Lower Oil Cooler Half by removing the 4 10mm bolts with the socket wrench and extension. Look for the 2 o-rings at the base.
Procedure Part 2 “Swapping out the old one for the new one”
Now you are at the difficult part. Take some deep breaths. Do some Yoga and stretches, especially your right arm and hand. Wear a latex glove if possible. For the next bit, you have to use your sense of touch alone.
1. Reach in there, and feel around for the HFH under the exaust manifold. It should be easy to find. Try to find all three clamps. It is possible the part of the HFH came off when you pulled the Oil Cooler out, so there may be a missing clamp or two. If you have all three, you can use the 90 degree nose Pliers to pull the one closest to you off. This will allow the small pipe section to come out. An alternative is to use some snips or tough scissors, and cut the HFH in half just to get this pipe and excess hose out so you can work.
2. Find the furthest clamp with your hand. Note the orientation of the prongs. If you’re lucky, they will be facing a direction which will allow you to use the Pliers, and it will come off in 10 seconds. But, if not, you will have to give it a few tries, and may have to turn the clamp to face a better position. You may want to use the pliers on the inside of the hose to open up the hose, and break the seal that it has. Then use the pliers to turn the hose and clamp, or possibly your hand (with heavy glove) and then use the pliers to grab the prongs, and pull it out of there. At one point, I used a razorblade to slice up the hose to turn the thing around, but I would only do that as a last resort. Note: Without the 90 degree pliers, I spent 4 hours trying to get the last clamp off with regular tools, and could not do it. It took maybe 10 seconds with the 90 degree pliers!
3. Once off, you can now grease up the pipes and new HFH and HFHOE ends with some engine oil, then pop the old Water Bypass Pipe on there (do not remove the prong clips yet), and put it back in place under the exaust. It may take a minute to get it on even with the engine oil. Now orientate the HFH so that it’s easy to get at the prong clips with the pliers, and get the pipe that connects to the Oil Cooler with two nuts aiming the correct way. Now use the pliers to remove the prong clips. (Do not use your fingers, as those clips prongs have a lot of stored energy, and can slice through skin like butter. (don’t ask how I know that)
Procedure Part 3 “Putting things back together”
1. Examine the Oil Cooler and Relief Valve, look for obvious damage to threads and blocked passageways. Replace any o-rings that you purchased. (lube them with a little engine oil)
2. Reattatch the Oil Cooler bracket/bottom to the block, and tighten the four nuts to 69 “inch” lbs.
3. Put the Oil Cooler top in position and connect the HFHOE (this may take a few minutes, don’t get frustrated, take a break and come back if it’s taking too long), also “loosely” connect the Water Bypass Pipe with the two nuts (don’t forget the metal gasket). Do not tighten it, you want it to have the ability to flex a bit.
4. Put some engine oil on the Relief Valve threads and tip. Lean over and look to make sure you can align the Oil Cooler top with the bottom. This is very important, and hard to do because the two hoses are fighting to put the Oil Cooler Top in a different position. Align them up, and then put the Relief Valve in place, and hand tighten. If it didn’t feel right going in, loosen it, and check for any damaged threads, if there are none, then it was probably ok, if there are some, clean them off, since this was only hand tight, the damage is small, and you can try again. When it’s going on correctly, tighten it down to 58 foot lbs. Do not overtighten, and if it feels funny, back it out, and check the threads for damage.
5. Tighten the two Water Bypass Pipe nuts to 69 “inch” lbs.
6. Reinstall the Oil Dipstick Tube by placing the bottom of the tube with the o-ring back in the block first then aligning the top bracket up with the water inlet and replacing the top 12mm bolt. (don’t drop it!)
7. Lube up the new oil filter bottom gasket with a drop of engine oil, and hand tighten.
8. Replace the heat shields and bolts.
9. Replace the intercooler pipes and clamps.
10. Replace the engine side vents and screws/bolts/zip ties, whatever you use.
Procedure Part 4 “Aftermath”
Check coolant level, fill as neccessary. Check oil for the heck of it. Start the car up, let it run for a minute or until the temp gauge goes over halfway. Let it cool down, and then fill the coolant again. Repeat as many times as it takes for the car to not overheat. Don’t worry about violent gurgling coming from the surge tank. This is normal during a filling procedure.
Once you’re sure the coolant is back to normal, drive it for a few minutes, and pay attention to your temp gauge. If it goes over the half way mark, just pull over, and let the car cool down for 10 minutes or so. Add some coolant, and continue.
Finally, if you have a comment/question/suggestion/correction, please e-mail me us!
Below are some pictures and descriptions to go along with the replacement procedure
Here are pictures from the 95 BGB on how to perform this task. You can use these pictures to replace the hose, or use them as a supplement to this document. The HFH is colored red in the first picture, and the white part in the middle is one of the three clamps (why the other two are not pictured, I don’t know). 


This documentation in no way replaces the Toyota MR2 Repair Manuals. The purpose of this content is only to provide supplementary information to fellow MR2 enthusiasts. Midship Runabout and its contributing authors will not be held responsible for any injury or damages that may occur as the result of practicing any of the methods or procedures described within this website. Article and photo submissions are property of the contributing author.